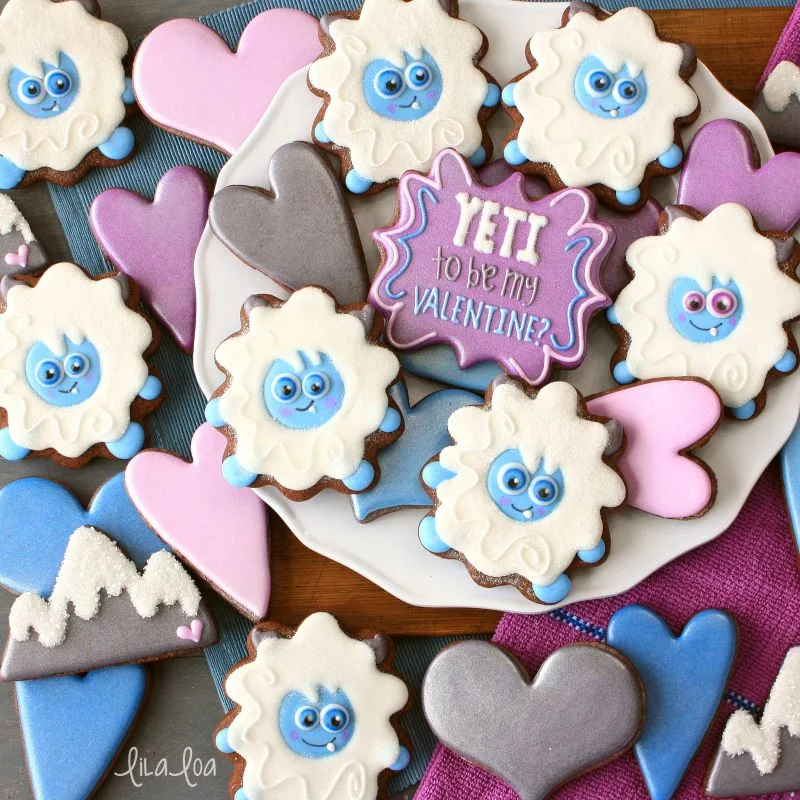
Learn how to make some adorable Yeti decorated sugar cookies with this royal icing cookie decorating tutorial!!
As it turns out, I think there's actually TWO OF ME. But...not at the same time. Goodness. That would be confusing. I don't think the two mes even like each other. It's very Dr. Jekyll and Mr. Hide of them. See, there's a Motivated Me and a very much UNmotivated Me.
Motivated Me runs 5 miles every morning. (Seriously...who DOES that?!) UNmotivated Me sleeps until 9am.
Motivated Me makes holiday plans and buys groceries and fixes the sticking doorjamb and then installs a door monitoring system because "it seemed like a good idea."
UNmotivated Me doesn't.
UNmotivated Me loves Netflix. And warm blankets and late night YouTube playlists about celebrities accidentally sending text messages to their mothers about zoo animals and cotton candy. (It's a THING.)
Ever gotten an email from me? You can be sure you were talking to Motivated Me.
Neither of them do laundry unfortunately.
Motivated Me gets excited about allllll the cookie holidays. And all the bright colors. And new cutter shapes. And plans and sketches and bakes and makes icing and THEN... let me just tell you... THAT is exactly the point where Motivated Me checks out and leaves UNmotivated Me to do the rest of the work. It does not end well for either of them.
Motivated Me has really been edging through lately. All these fun Valentine's Day cookie ideas coming out. My kitchen got MOPPED for the first time in...well...it's been long enough that I don't know if you'll still like me if I'm honest. So let's just say...it's been more than a few hours and less than a century.
But then...I think Motivated Me got tired of shoveling snow and went somewhere tropical. And UNmotivated Me ended up with a few trays of half-finished cookies and a basket of leaking piping bags.
So UNmotivated Me took a nap or three. And went Sanity Shopping at Target. (You know what I'm talking about, right? Where you go and get a drink at the cafe and walk around every single department, carefully browsing through each item...checking to see which colors those hand towels come in... taking a quick peak at the new patterns on the newborn diapers... making a mental note of how many sizes of those diamond studded, butterfly jeans are still left on the clearance rack.... all with absolutely NO intention of buying anything ever. And very nearly make it...)
You know what UNmotivated Me didn't do? Finish these cookies and this blog post. That's for sure.
How to make Yeti decorated sugar cookies:
Step 1.
Place a small round cutter in the center of the cookie. Trace around it with a food color marker. Outline and fill the circle with a medium consistency blue icing and a #1.5 tip. Add little hand and feet blobbies with the same icing. (So weird that spellcheck isn't recognizing the word "blobbies".)Step 2.
Pipe some triangular-ishly shaped horns at the top with some gray icing and a #1.5 tip. Let dry for at least four hours.Step 3.
Grab some medium consistency white icing and a #3 tip. Loosely following the outside curves of the cookie, outline and fill the body area of the cookie. Add some wind-swept fur across the top of the Yeti's face.
Step 4.
Immediately cover the wet icing with granulated sugar. (Make sure you use granulated, not sanding sugar.) Shake off the excess sugar.Step 5.
Pipe the left eyeball. Eyeballs are just a series of dots piped over the top of each other while the icing is still wet.Start with a large dot of white icing. Add a medium sized dot of blue icing to the center of the white icing. Add a slightly smaller dot of light blue icing to that. (You can TOTALLY just use one color of blue icing. But I love the dimension that two shades of one color gives to an eyeball. I always try to work two colors in there if I can.)
Add a dot of black icing to the center of the blues. Then pipe a much smaller dot of white icing to the top right edge of the black dot of icing to create the reflection dot.
Let dry for 15 minutes.
Step 6.
Add another eyeball using the same pattern. Draw a mouth with a black food color marker. Add a small dot of white icing below the mouth and use a toothpick or scribe tool to pull it down to a point to make a tooth.Use a pink food color markers to add pink to the cheeks.
Add a squiggly fur detail line with the same white icing and a #1.5 tip. (This is why you have to use granulated sugar. You can't pipe details like this over sanding sugar.)
See it in action here.
NEED MORE??
Get the supplies: Yeti cutter (or HERE), large heart cutter, plaque cutter, mountain cutter, and black food color marker.
See how I used this cutter to make Valentine's Day Love Monster Cookies!
Check out the Yeti color palette and icing formulas here.
Check out the Yeti color palette and icing formulas here.


