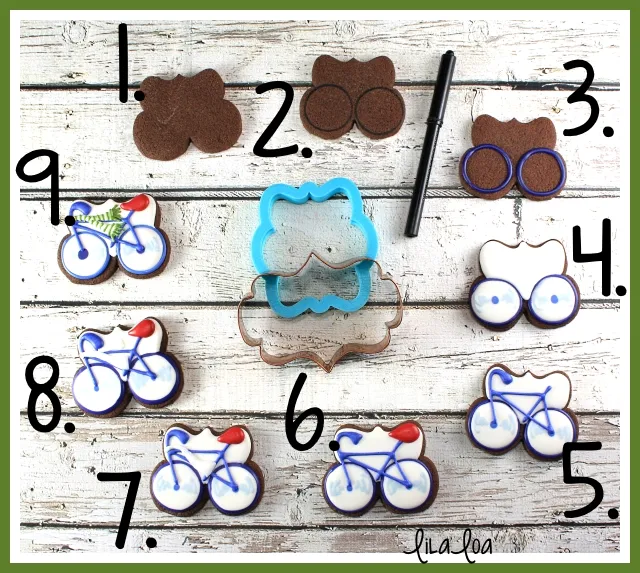
So yeah. I made bicycle cookies for Christmas. It seemed like the thing to do. And you know I'm all about doing that. And by "that" I mean "whatever in the world I want to because I'm a grown up and I'm basically the supreme ruler and chancellor of my own life." Except for when it comes to laundry and mopping and making actual
food. And then the crying and the whining and the guilt is the boss of me, because I just want it to end before I lose my ever-loving mind. Again. For the 12th time today.
But it's almost Christmas! And tomorrow is the WINTER SOLSTICE!!! And that means that the sun will eventually come back again. And someday there will be a day where my children play OUTSIDE without eleventy hundred layers of scarves and stockings and mittens and gloves and boots that *I* must first secure because they put their gloves on first and can't possibly take them off again to zip up their coat or lace their boots or find their hats. Because everyone knows that it takes bare hands to find hats.
So that's a pretty good reason to celebrate if you ask me. And what's a winter celebration without decorated bicycle cookies?! Seriously...are you guys having actual parties without decorated bicycle cookies?! Awkward. Trust me. It's like a thing.
1. There's a million steps...but it's not really complicated. And you can totally stop at step 6 if you want. I won't judge. Start by cutting out cookie dough with the "Vicki" plaque from Whisked Away Cutters. Cut the bottom off with any cutter that juts out with a curved edge. I used the "Belgium" plaque from Copper Gifts, but there are quite a few that would work. Bake as your normally do.
2. Use a food color marker to trace around a small circle cutter to mark where the wheels will go.
3. Use a medium consistency icing and a #3 tip to pipe each wheel. Let dry for 30 minutes.
4. Flood the center of each wheel with white icing. Immediately pipe a dot in the center of each wheel with blue icing. Add speed lines with a pale blue icing and a #1.5 tip. Flood the rest of the cookie with white icing. Let dry for 3-4 hours.
5. Pipe the frame of the bicycle with the same blue icing as before. Let dry for 15 minutes.
6. Follow the curves of the cookie to pipe a bicycle seat with a medium consistency red icing and a #3 tip. (This is the point where you would stop if you were "normal". But feel free to continue if you are a Christmas-Overachiever."
7. Pipe half of the scarf with a medium consistency white icing. Let dry for 15 minutes.
8. Pipe the second half of the scarf with the same icing and let dry for an hour.
9. Pipe small stripes and a fringe on the scarf with a medium consistency green icing and a #1.5 tip.
See it in action here.
NEED MORE???
Grab the supplies -- Vicki Plaque Cutter, Belgium Plaque Cutter, Ornament Cutter, and Star Stencil. (I used the 3.5 by 3.25" Vicki Plaque.)
Learn how to make the most PERFECT BOW COOKIES EVER with Delorse of Sword's Sugars.
See how I made my super easy CANDY CANE COOKIES.


