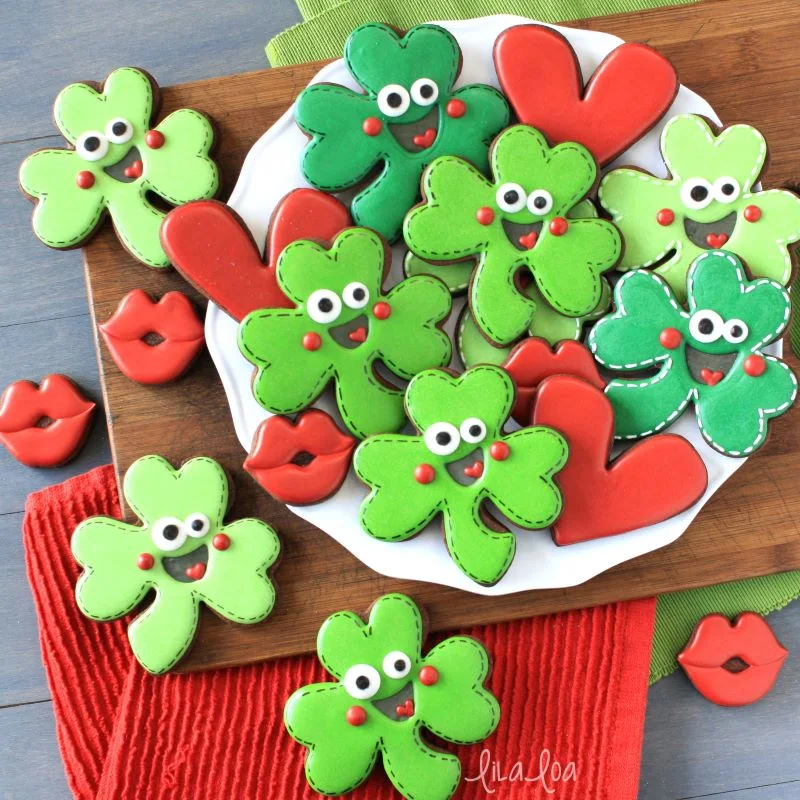
Learn how to make some adorable and happy shamrock decorated sugar cookies with this royal icing cookie decorating tutorial!!
When I lived in South Korea....it was a pretty big deal to me to be able to connect with other living people that also liked to eat sugar and play with their food and really really really didn't know how to make it through en entire grocery shopping trip without a colossal meltdown of epic proportions as well. You know...basic every day stuff.
And my other very favoritest thing of all is how being part of this community makes me feel like a renaissance artist in Italy. Think about it. Those amazing architects and philosophers and artists all hanging around at the Medici house...eating left over pizza and talking about their newest projects and ideas and I bet Boticelli was like "Hey I've got this great idea - check it out!"
And DaVinci was all, "Ohhhhh!!!! That's so cool! You know what you should do...."
And Boticelli was like, "YESSSSS!" and then he threw popcorn at DaVinci...because they are still boys after all. And then the art was even more amazing because they were friends and they built on the ideas of each other.
Because I do not for one second believe that the amazing growth of the arts and craftsmanship during the renaissance happened as a result of competition between those incredibly talented individuals.
I LOVE when an idea gets passed UPWARD, OUTWARD, SIDEWAYS. I love when a cookie or design sparks new joy. When someone sees a cookie and takes it a step further. Because it HELPS ME to take my next designs, my next idea or project, further in a way I couldn't have done myself.
For example. One time I made these Lady Liberty cookies. And they were fun. And I mediocre liked them. But they just weren't THERE. You know? Like...I wanted them to be more (or technically LESS) than they were...but I couldn't get them there. Because I'm an over-detailer. I over-detail cookies like I'm getting paid for it.
And then Jill from Jill FCS made THESE GEMS. And they are perfection. And for me...they opened a whole new path in my brain. And sometimes, when I'm trying to simplify a design, I'll still come back to these cookies to see how she made the jump across a design chasm where I couldn't find a bridge.
I LOVE THAT.
These happy shamrock cookies came from that community think. We were discussing St. Patrick's Day cookie ideas in my Facebook group (THIS ONE) and my new friend Bryn from Bryn's Cookie Bin suggested that my Happy Heart design would be so cute on shamrocks. AND SHE WAS RIGHT!!! I'm obsessed.
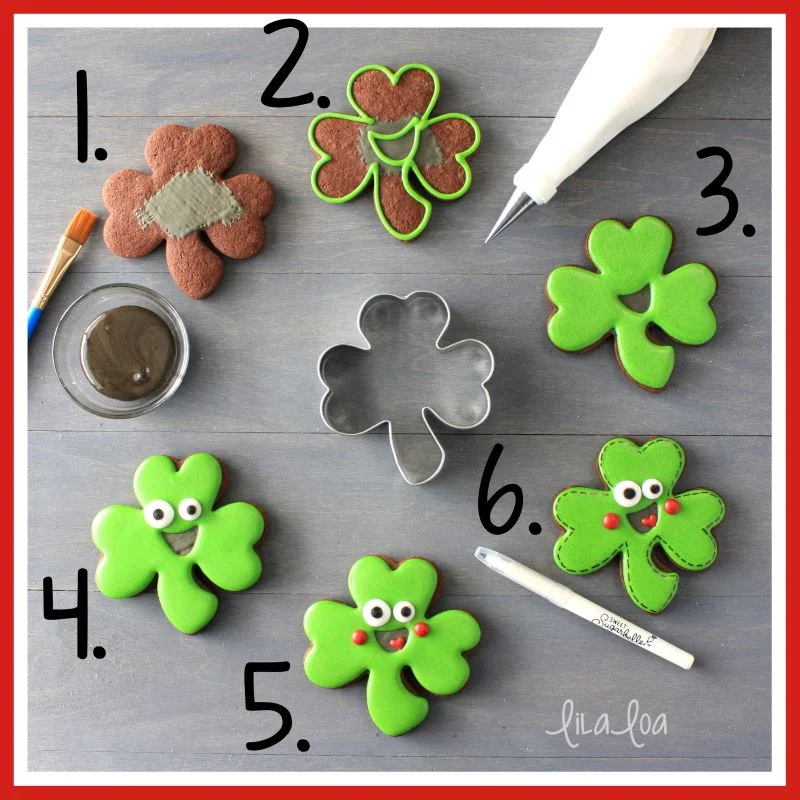
How to make happy shamrock decorated sugar cookies for St. Patrick's Day:
Step 1.
Thin down some black icing. A lot. Like a 5 count icing. Use a wide food grade brush to paint some on the center portion of the cookie. Let it dry for about 15 minutes.Step 2.
Using medium consistency green icing and a #3 tip, pipe a mouth and outline the shamrock.Step 3.
Immediately fill in the space in between with the same icing. Let it dry for at least an hour.Step 4.
Pipe two dots of white icing for eyes and two more dots of black icing on top.Step 5.
Use medium consistency red icing and a #2 tip to pipe little cheeks and a tiny heart for a tongue.Step 6.
Use a black food color marker to add stitch lines all around the outside edge of the shamrock. (You could also pipe stitch lines with a thick consistency icing and a #1.5 tip.)See it in action here.
NEED MORE??
Get the supplies: shamrock cutter, alphabet cutters, pot of gold cutter, flower cutter, lip cutter, heart cutter, leprechaun cutter, and the black food color marker.
-- OR --
Grab all the supplies in ONE EASY PLACE with my Shamrock Decorating Kit from Global Belly!!
Grab the St. Patrick's Day color formulas here!!
Grab the St. Patrick's Day color formulas here!!


