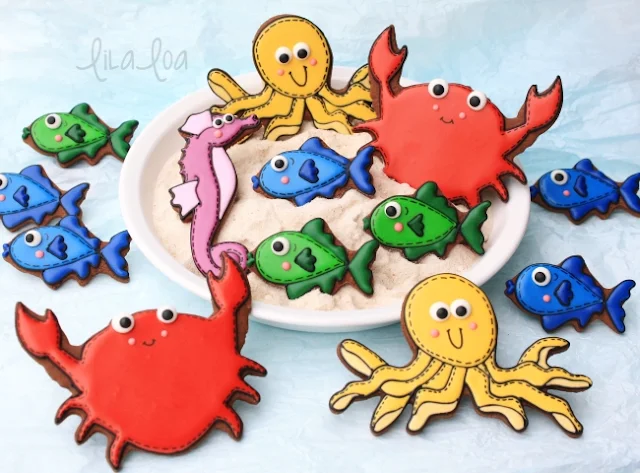
You guys know this is my favorite day of the month! I get to peruse my cousin's fantastic paper creation blog and then recreate one of them in sugar form. I actually made these awhile and I have been SAVING them for some reason that even I don't comprehend. And also I may have forgotten I had them for awhile. But here we are with some of the cutest, most adorablest sea creature cookies I've ever made.
Which is not a surprise considering I used this CUTEST BEYOND WORDS crab card as my inspiration!!!! WHY did I not also make the flower?! (Because I'm just awful at flowers, that's why. But next time...Imma brave it anyway. It's just too cute.)
1. Bake yourself a crab shaped cookie. You can eat one of them if you want to. I won't tell.
2. Using thick black icing and a #2 tip, outline the entire cookie. For some reason, I thought it made sense to leave gaps for the eyes. But...it doesn't. Just outline the whole thing. Let the outline dry for an hour or 60 minutes -- whichever comes first.
3. Flood the middle of the cookie with medium consistency red icing. Let it dry completely.
4. Put a drop of red icing on the back of a pre-made eyeball and squish them down at the top of that cute little crab's face. Add some pink little cheek circles. With thick black icing or a food color marker, add a smile and some stitch lines around the edges.
1. This guy has 8 legs. That's kind of a lot. Don't freak out though. You can do this. Using a thick black icing, pipe the head first and then starting from the left and working to the right, outline every other leg.
2. Come back and fill in the missing legs. If you're not sure where the leg should go, just make a squiggly line. That seemed to work well for me. Then pipe a curved line at the end of each leg. Let the outline dry for a couple of hours.
3. You are going to be filling in some tiny spaces here. Make sure you use new icing or a dehydrator/fan. I used both....because that's the kind of person I am. Flood the face and the top portion of each leg with a bright yellow icing. Use a toothpick to guide the icing into any cramped little corner that it is desperately trying to stay away from. Then fill in the ends of each leg with a lighter yellow icing. Let it dry overnight.
4. Using a small drop of icing, attach some pre-made eyeballs. With pink icing, make some adorable little cheeks. As a finishing touch -- use thick black icing or a food color marker to add a happy little smile and some stitch lines around the outside of the head and the top of each leg.
1. Using thick black icing, outline the body. Add some fins on top and bottom, and a squiggly shaped tail. Let dry for an hour or so.
2. Flood the body with light blue medium consistency icing. Flood the fins and tail with a darker blue icing and let dry for 3-4 hours.
3. Using your thick black icing to pipe another fin on top of the body. (How many fins does one fish NEED?) Let that dry for another hour.
4. Fill in the fin with dark blue icing, and add some lips with the same color. (He's got LIPS too? This is one crazy fish.) Put a drop of blue icing on the back of a pre-made eyeball and attach it to his face. Using pink icing, give him a little cheek somewhere below the eyeball. Using thick black icing or a food color marker, give him an eyebrow and add some stitches along the outside of the body.
1. I kind of love seahorse cookies. And I'm afraid of them. But not this one. This was was actually easier than I expected. Start by outlining the fins on the seahorse first with thick black icing.
2. Starting in the middle of the tail, pipe a swirl pattern outwards and then up the right edge of the cookie. If you could find it in your heart to make a couple of your swirls a little wonky like mine, I would really appreciate the show of solidarity on this one. Finish outlining the rest of the body. Let your outline dry for at least an hour.
3. With flood consistency dark fuschia type icing, fill in the body area and then use light colored fuschia type icing to flood the fins and stomach area of the seahorse. Let that dry overnight.
4. Put a drop of that fuschia type icing on the back of some pre-made eyeballs and attach them right next to each other at the top of the head. I suppose you really only have to use one if you wanted to conserve eyeballs or if you just felt it looked better with one, but I'm going to tell you right now that...umm, I used two. Add some pink cheeks. With thick black icing or a food color marker, add stitches around the edges of the cookie. Look really close at the tail part though..don't go all the way to the middle with both sides. It just looks busy. End your outside line of stitches at the beginning of the swirl. Now that I've complicated that beyond belief... let's call it a day, shall we?
NEED MORE?
Go see which of my cookie designs Pam made into a card HERE.
Grab the cutters for the CRAB, OCTOPUS, SEAHORSE, and FISH here.
Simple Seahorse Cookies with Callye of Sweet Sugarbelle.
See how to make all four of these sailboats HERE.


