

Can we talk about paper for a minute? More specifically -- the pages of a book. I know I'm a blogger and this pretty much goes against everything internetty that ever was... but I just adore books. I like the weight of them. And the smooth smooth paper. And I like that things stay in the same place. If that one recipe you love and adore more than your first glitter nail polish is on the bottom of the left page...it's always going to be on the bottom of the left page. You can ACTUALLY book mark it and it will always be right where you left it. And you can flip back and forth between two pages for as long as you like. You don't have to click on something to make it bigger. It's already bigger. And it doesn't have to load. You don't have to charge it. And if you accidentally spill your drink on a book (who does that???!)... it's probably still going to be okay. Maybe a little wrinkled or wavy...but still totally functional.
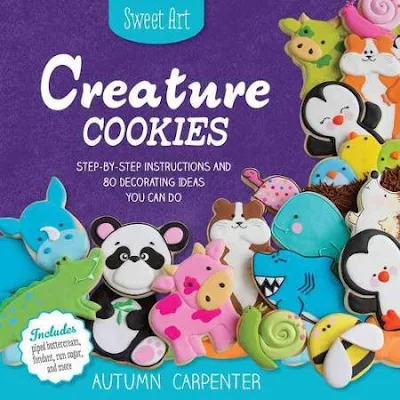
And in all of my love of books...COOKIE BOOKS get a special place in my heart. Right next to ice cream. And naps. As soon as I saw the cover for Autumn's new Creature Cookies book -- I was in love. I couldn't wait to hold it in my own hot little hands. And let me just tell you --- it did NOT disappoint!!! It's got bright colors, step-by-step photos and instructions and a ton of fun new techniques. (Which is not a surprise since this is the girl that gave the world The Complete Photo Guide to Cookie Decorating.)

And I mean -- just LOOK at these adorable little things!!!! I want to squish them!!! And then make some myself!!! Except.... you know I can't ever just leave well enough alone. So I had to put snorkels on them and all. And make giant waves to go with them. Want to make some waves? (Ha! I've never said that before!)

1. Outline and fill a circle cookie with white icing. Let it dry overnight.
2. Use a sunburst stencil and yellow airbrush spray to make a sun at the top of the circle.
3. (First -- let's just acknowledge the awkward weirdness that is the sun and sun rays in this picture. I forgot to take a picture of this step and then tried to re-create it without actually getting my airbrush out again. Lazy, party of one right here.) Outline the wave section with thick blue icing. Fill in the wave with thin consistency light blue icing. Add a few more lines with medium consistency white icing and the thick blue icing.
4. Use a toothpick or scriber to scribble back and forth through the lines real quick. Don't over do it. Just mish-mash it up real quick and let it go. Ta da! Ocean wave.
You can get your own copy HERE. And in case you are wondering... I used THIS CUTTER for the penguin.
