It's very nearly June. Can you believe it? It's time to make your New Summer Resolutions!!!
I pretty much gave up on New Year's Resolutions when I had my 4th child. Children are like electrons, they get excited when there are more of them in a smaller space. And my living room is basically a nuclear reactor in the winter. And not in a good way. More in a "I would like to hide behind this couch and cry for the next 3 1/2 months but I can't because I think the baby just got naked and is heading toward the bathroom" kind of way. My only New Year's Resolutions for the last few years have been continuing to exist on a daily basis until the sun shines again and my children can go kick the soccer ball at the fence until it falls down. (It actually did today. So tomorrow after school we're going to play, "Let's learn how to use a power drill safely.")
PLUS... New Summer Resolutions are exciting because you can actually DO STUFF. I mean, besides the crying and the shivering. My New Summer Resolutions are:
1. Actually stick to a decorating schedule.
2. ENJOY MY WHOLE ENTIRE SUMMER.
3. The end.
And to all of my down under friends -- just TRY and make resolutions right now!! See how it feels to be trying to "make yourself better" and "improving yourself" when all you can think about it where your next ray of sunshine will come from. You're lucky that summer and the new year happen together. It's like double motivation!
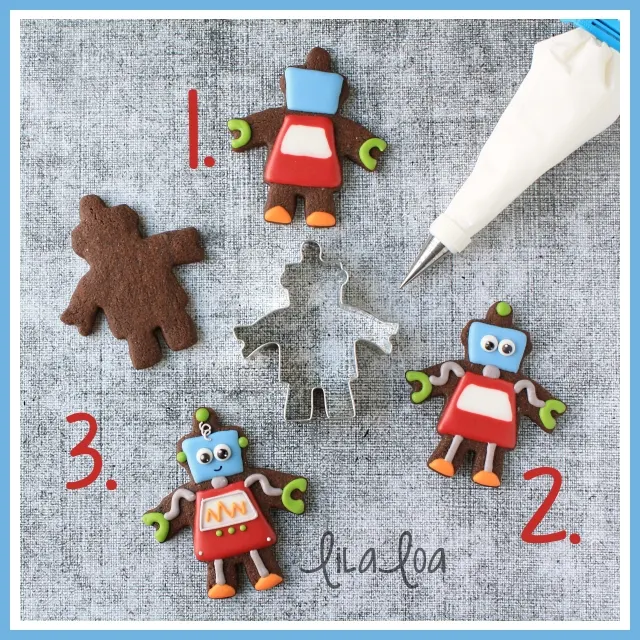
Also... I got a new cutter from Ann Clark. And I made robot cookies. FOR MY OWN CHILDREN. See? Summer really is a miracle worker. Want to make some? Don't get all nervous when you see those words down there. There are lots of little parts on a robot...but they aren't complicated.
1. Outline and fill the head with a medium consistency light blue icing. Outline the chest area with medium consistency red icing. Leave a square-ish gap in the middle. Fill that gap with medium consistency white icing. (We don't really have to worry about color bleed because we are going to outline it later.) Add some "C" shapes for hands and half-circles for feet. Let all this icing dry for 30 minutes or until it's pretty well set.
2. Add a dot above the head. Really, you could have done this in the first step, but it just seemed so complicated already. Use medium consistency gray icing to add a neck, arms, and legs. Pipe two dots with white icing for eyes. Immediately add two dots of black icing. Use a scribe tool or toothpick to add two tiny dots of white icing to the top left of the black dot. Let your cookie dry overnight.
3. Use thick gray icing and a #1.5 tip to pipe a swirly spring to connect the head to the green dot. (Which is apparently an antennae?) (I really don't know my robot anatomy.) Outline the monitor on the chest with the same thick gray icing and add 2 small dots for rivets to the bottom corners of the body. Use thick orange icing to pipe some zig-zag readouts on the monitor. Pipe 3 small dots for knobs under the monitor and add some ears with the medium consistency green icing. Use a food color marker or thick black icing to add a smile.
And if you want to see it all in action... I've got you covered. Except, the robot in the video doesn't have ears. Apparently he's Z-wave technology. Or something like that that doesn't involve me losing my mind and forgetting ears altogether.
NEED MORE??
Grab this brand new Ann Clark ROBOT CUTTER HERE.
Learn how to make GEAR COOKIES from a flower or sun cutter.
See Sweet Sugarbelle's CREATIVE ROBOT COOKIES.


