
Street markets were all the rage when I lived in South Korea. They had been for hundreds of years. My kids loved them because they knew if they found something they wanted they could leverage the shop owner against me as well as their own youthful smiles and charm. And they knew that if there were enough "I love you forever Mommies" while the shop owner pushed the items at me, I would end up with another bag hanging off my arm while we went off in search of cinnamon-walnut filled bread and mini water bottles with a cartoon character cap.
But I drew the line at junk. There was a little wind-up mouth toy that my 5 year old desperately wanted. Desperately. He had moved right past the exclamations of love, through begging and very nearly into the tantrums before collecting himself and settling on the pitiful "I thought you loved me but now I know I was wrong forever" face. And let me be clear. I do love him forever. But the toy was worth about 12 cents. It was a little mouth that you wind up and it walks across the floor or counter as it opens and shuts. And no matter how well you wind it up, it would only work for 4 seconds and then, even at the shop, the top lip would fall off. I wasn't buying it. So I did what any good mom would do -- I distracted him with the offer of an ice cream cone. And as we turned to walk away, I saw the shop owner slip my son that wind-up mouth toy anyway. No wonder they loved the street markets.
I feel like that wind-up toy around the holidays. I get so excited for the next holiday. I can't wait to start decorating my house and making fun holiday cookies. And I start too early. And I go really strong for about 4 seconds and then I fall apart. Basically, what I'm saying is that everyone else in the world is on track for Valentine's Day and I pulled out my St. Patrick's Day cutters yesterday. And made birthday cookies this week. And I'm washing out my red and pink bowls of icing later today. I hanging up the proverbial hat and letting my lips fall off.

But that's okay with me, because it means I got to make these fun cookies. My cousin Pam makes incredibly creative and gorgeous paper cards on her blog Simply Pam's Creations. And once a month she lets me snag a design and make cookies with it.

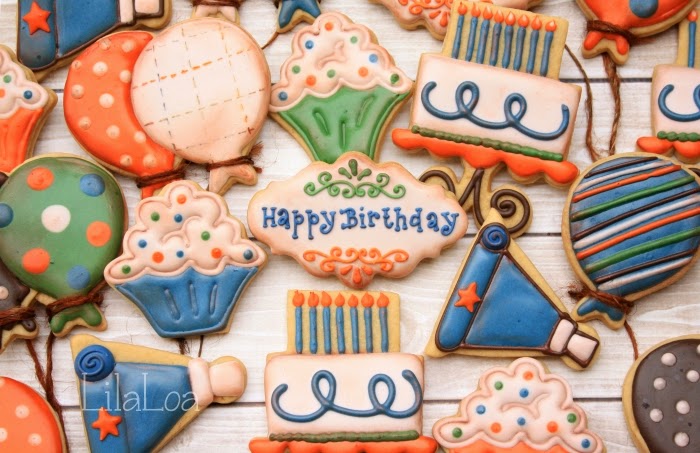
This is the card I chose this month. You can find out how she made it HERE. Tell me you don't love it.Tell me it doesn't make you want to make an entire set of birthday cookies. Actually, don't tell me that because it would break my heart. And you would end up seeing my "I thought you loved me but now I know I was wrong forever" face. And because I *do* love you, I'm not letting you walk away with nothing. I'll show you how I made the party blower cookies. Two ways even.

2. Pipe a small circle on the top left corner of the baked cookie. Pipe the long oval-ey cigar shape below it. All the rest is squares and straight lines. Let the outline dry for 20 minutes.
3. Fill everything in with the colors of your choice. Such an easy cookie. I love it. Let it dry for a couple of hours or overnight.
4. With stiff icing and a small tip, pipe a swirl on the circle part and give it a heart or a star or a letter or number on the end of the blower curl.

1. You can also make this cookie without outlining anything. Use a medium consistency icing and start with a big ol' dot in the top left corner. Pipe a square-ish shape for the tip of the blower. Let it dry for 30 minutes.
2. Add the rest of the blower curl and pipe a line below the blower tip. Let dry again for a bit.
3. Fill in the rest of the blower. And let dry for a few hours or overnight.
4. With thick icing and a small tip, pipe a swirl on the circle part and a design on the blower curl. I also happened to shade this cookie before taking the last photo, but you totally don't have to do that. You can if you want to though. I won't stop you.

NEED MORE?

See what cookies Pam made into a card HERE.

Find the party hat cutter HERE or HERE..
I cut off the bottom of the yellow ice cream cutter in THIS SET to make the cupcakes.

I used mahogany luster dust and THIS technique for shading these cookies.

Check out this cupcake swirl tutorial.

More birthday cookies from The Decorated Cookie.
