These days I have kids. And I'm married to a guy who eats actual food. On a daily basis. It gets tricky. So I have created a system for making dinner. Basically, I take a whole bunch of different foods out of the fridge and freezer. You know, like vegetables, rice, eggs.... stuff that people eat. And then I pour it all into a bowl. Or a blender. Sometimes I even heat it up. And then...I hope madly that it isn't disgusting. Some days it works out and some days it doesn't. When all else fails, I add garlic and cheese.
These cookies were kind of like that. I threw a bunch of St. Patrick's Day themes in a blender and spread them on a cookie. I wasn't really sure how they would turn out. And even after they were done, I couldn't decide if I liked them or not. I asked my husband if he thought they needed cheese...but he said to just leave them alone.
It takes a lot of icing colors and about a jillion (ten) steps to make these, but they really are quite simple. Each step only needs to dry for about 15 minutes or until it starts to look a little dry-ish. The colors are bright enough that none of them will really bleed into the other.
Also -- I used 12-15 second icing for this. If you decorate only by outlining and filling -- try outlining everything with white or black first. And if you do that, you can fill every other color section instead of doing one at a time.
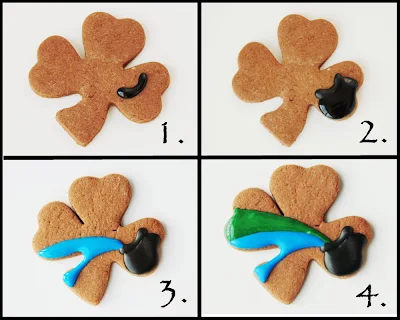
1. Pipe a semi-curved line in the middle of the third leaf.This is the rim of the pot o' gold.
2. Add a circle shaped bottom to create the...umm, bottom.
3. Start with blue and curve your line from the left to the right, ending at the pot.
4. Add green on top. (For every line after blue, I started at the pot and went to the left. It was easier to keep it skinny at the pot. And to be honest, I decorated these cookies upside down because it was easier to keep the gentle curve that way. I'm weird. Do what you want.)
5. Add yellow.
6. Then orange.
7. And red. And then stop for a while. You are going to be adding white next and all that red needs to dry a bit first so you don't end up with pink.
8. After at least an hour of waiting and waiting and waiting, add your white background.
9. Let the white dry a bit. And then pipe on some gold coins.
10. Immediately cover with some yellowish sanding sugar. Shake it off and you are done. No need to add cheese or garlic or anything.
Feel free to visit Sugarbelle's HERE to see how I made the little leprechaun hats.


